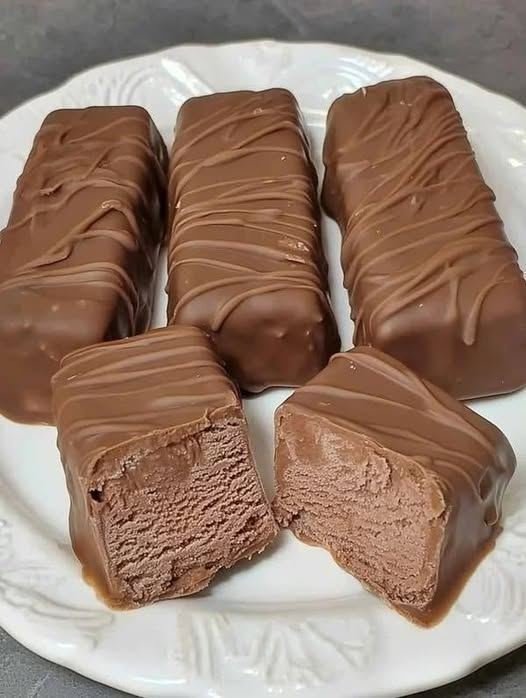
If you’ve been searching for a rich, creamy, chocolatey dessert that fits perfectly into a low-carb lifestyle, this Keto Musketeer Candy recipe is exactly what you need. These homemade candy bars are soft and fluffy in the center with a smooth chocolate coating on the outside, giving you the same satisfying experience as classic chocolate bars—without the sugar overload.
The best part is how simple this recipe is. You only need a few keto-friendly ingredients and basic kitchen tools to create a dessert that tastes indulgent while still supporting your low-carb goals. Whether you enjoy them as an afternoon snack, post-dinner dessert, or quick energy bite, these bars are guaranteed to become one of your favorite homemade keto treats.
The inside filling is creamy and slightly mousse-like thanks to the combination of almond butter and heavy cream, while the outer chocolate shell adds the perfect snap and richness. They are naturally sugar-free, gluten-free, and keto-friendly, making them ideal for anyone trying to reduce carbs without giving up desserts.
Why You’ll Love This Keto Candy
There are so many reasons to love these homemade keto candy bars:
- Soft and creamy texture inside
- Rich chocolate coating outside
- Low in carbs and sugar-free
- Easy to prepare at home
- Perfect for meal prep and storage
- Great for satisfying sweet cravings
- Uses simple keto pantry ingredients
- Ready with minimal cooking time
Unlike many store-bought keto desserts, these bars taste fresh and homemade. You can also customize them with different nut butters, toppings, or flavors depending on your preference.
Recipe Information
Prep Time: 10 minutes
Cook Time: 5 minutes
Chill Time: 1 hour 30 minutes
Total Time: About 1 hour 45 minutes
Servings: 10 bars
Calories: Approximately 170 calories per bar
Diet Type:
- Keto
- Low-carb
- Sugar-free
- Gluten-free
Equipment You’ll Need
Before starting, make sure you have these kitchen tools ready:
- Medium saucepan
- Whisk
- Spatula
- Heat-proof bowl
- Baking tray or small pan
- Parchment paper
- Knife
- Refrigerator or freezer
These are all simple tools commonly found in most kitchens.
Ingredients
Here’s everything you need for the recipe:
- 1 cup unsweetened almond butter
- 2 tablespoons coconut oil
- ¼ cup heavy cream
- ¼ cup powdered erythritol
- 1 teaspoon vanilla extract
- Pinch of salt
- ½ cup keto-friendly chocolate chips
Optional toppings:
- Chopped almonds
- Sea salt flakes
- Unsweetened coconut
- Sugar-free chocolate drizzle
Step-by-Step Instructions
Step 1: Prepare Your Workspace
Start by preparing your kitchen area before heating anything. Line a baking tray or small dish with parchment paper. Lightly grease the parchment paper using a small amount of coconut oil. This prevents sticking later and helps remove the bars easily after chilling.
Set the tray aside while preparing the filling mixture.
Step 2: Melt the Coconut Oil
Place a medium saucepan over low heat. Add the coconut oil and allow it to melt slowly. Avoid using high heat because coconut oil can overheat quickly, which may affect the smooth texture of the candy filling.
Once fully melted, remove the pan from direct heat for a few seconds before adding the remaining ingredients.
Step 3: Make the Creamy Filling
Add the almond butter into the saucepan along with the heavy cream, powdered erythritol, vanilla extract, and a small pinch of salt.
Use a whisk to combine everything thoroughly. Continue stirring gently over low heat until the mixture becomes smooth, creamy, and slightly thick.
The texture should resemble a silky mousse-like filling without lumps. The almond butter creates richness while the heavy cream helps make the inside soft and fluffy.
If the mixture feels too thick, you can add an extra tablespoon of heavy cream to loosen it slightly.
Step 4: Spread the Mixture
Pour the prepared mixture onto the lined baking tray. Use a spatula to spread it evenly into a rectangular shape.
You can make the layer thicker if you want chunky candy bars or thinner for smaller snack-sized pieces. Try to smooth the surface evenly so the bars look neat once cut.
At this stage, you can also sprinkle chopped nuts or unsweetened coconut on top for added texture.
Step 5: Chill Until Firm
Place the tray into the refrigerator for about 1 hour. During this time, the mixture will firm up enough to cut into bars.
If you are in a hurry, you can place it in the freezer for about 25–30 minutes instead.
The filling should feel solid but still slightly soft when touched.
Step 6: Cut into Candy Bars
Remove the chilled filling from the refrigerator. Carefully lift it using the parchment paper and place it onto a cutting board.
Use a sharp knife to cut the mixture into evenly sized bars or squares. You can create classic rectangular candy bars or bite-sized cubes depending on your preference.
If the knife sticks, lightly grease it with coconut oil before cutting.
Step 7: Melt the Chocolate
Place the keto-friendly chocolate chips into a heat-proof bowl.
Microwave in 30-second intervals, stirring after each interval until the chocolate becomes fully melted and smooth. Be careful not to overheat the chocolate because it can burn quickly.
If you prefer, you can melt the chocolate using a double-boiler method on the stove.
For extra glossy chocolate coating, stir in 1 teaspoon of coconut oil after melting.
Step 8: Coat Each Bar
Take each chilled bar and dip it into the melted chocolate using two forks or a spoon. Make sure all sides are coated evenly.
Allow any extra chocolate to drip off before placing the coated bar back onto the parchment-lined tray.
Repeat this process for all the bars.
You can also drizzle extra chocolate over the top for a bakery-style appearance.
Step 9: Final Chill
Once all bars are coated, place the tray back into the refrigerator for another 30 minutes.
This final chilling step helps the chocolate harden completely and gives the candy bars their perfect texture.
After chilling, the outer shell should have a slight snap while the inside remains creamy and soft.
Texture and Flavor
These keto candy bars have an incredibly satisfying texture. The inside is smooth, creamy, and fluffy, while the outer chocolate layer adds richness and crunch.
The almond butter gives a subtle nutty flavor, balanced perfectly by vanilla and chocolate. Because they are made with erythritol instead of sugar, the sweetness is lighter and more natural compared to traditional candy bars.
They taste indulgent without feeling overly heavy.
Storage Instructions
Refrigerator
Store the bars in an airtight container in the fridge for up to 1 week.
Freezer
Freeze for up to 3 months. Let them sit at room temperature for a few minutes before eating for the best texture.
These bars are excellent for meal prep because they stay firm and fresh for days.
Helpful Tips
- Use powdered sweetener for smoother filling
- Keep heat low to avoid oily separation
- Chill properly before cutting
- Stir chocolate frequently while melting
- Use parchment paper for easy removal
- Add extra vanilla for stronger flavor
Final Thoughts
This Keto Musketeer Candy recipe is proof that low-carb desserts can still taste rich, creamy, and satisfying. With its fluffy center and chocolate coating, it feels like a real candy bar while staying completely keto-friendly.
The recipe is simple enough for beginners but delicious enough to impress anyone. Whether you’re following a keto lifestyle or simply trying to reduce sugar, these homemade candy bars are a perfect sweet treat to keep in your fridge.
Once you make them, you’ll probably want a batch ready every single week because they’re easy, delicious, and perfect for satisfying chocolate cravings without breaking your diet.